Saturday, July 22, 2006

Prelim work

In continuing to recap the basement progress to get to present....

In about november-december I had the initial design done. After doing some reading, I had decided to attempt the following work myself -- framing, electric, hanging doors, finish work, tiling, painting, and cabinet installing. i did want to take a crack (get it , crack?) at dry-walling, but, it seemed like a good task to hire out. I definitely didn't want to try plumbing.

So, at this point, I was anxious to start hammerin'. There were a couple of smaller jobs that I needed to get done first. As per my design, i wanted to have the bar-sink against the wall -- this would allow plenty of room for the pingpong table. however, the drain for the sink was already in the floor, about 7ft away from the outer walll. Clearly this woudln't fit the design, so I needed it to be moved.

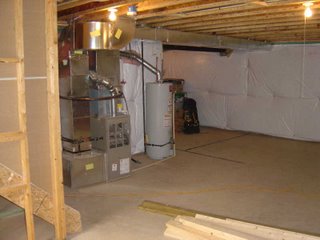
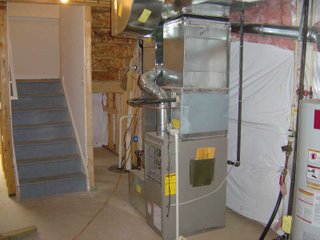
Another problem was the HVAC room. Since the furance and water-heater were located almost directly at the bottom of the stairs (a poor design in my opinion), there was little option on the design. Also, I was forced to have an irregular wall shape (had to make an angled segment).

At this point, knew that I needed some contractor help. But most all of the listings/advertisements are for general contractors who want to do the whole job. It's much harder to find contractors to do partial work. Luckily, a friend of mine had finished his basement, and done some of the work himself. So, got the recommendation from him, and talked to his guy -- Ricky. Him, along with others he knew, could cover most of the work that I couldn't. i wouldn't say Ricky was a top-of-the-line contractor, but, he was still exactly what I wanted -- competent and not too expensive.

So I had Ricky and his crew come out and 1) move the sink drain from the middle of the room to the wall, and 2) do the framing around the HVAC room. The jack-hammering looked a little tough, but they did a great job (just one day). The total cost of both was only $900.

That brings me to another purpose for this blog, an attempt to capture the total price. Though I kept a general count of the cost, I didn't account for all those little trips to Lowes/homeDepot. The idea is going forward (when I get caught up on this blog) that I'll keep better track of the total price. So, as of this posting, I had spent , you guessed it, $900.
Friday, July 21, 2006

Starting from nothing

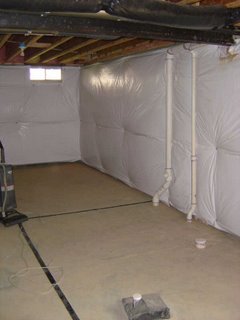
At this stage, it's tough to look at the basement as it was, and imagine the final product, given the expanse of dusty concrete and poorly lit walls. The basement just consisted of the insulation that was tacked to the wall, a few pluming rough-ins, and a couple of simple pull-string light-bulbs. Below are the pictures of how the basement looked. I wish I had taken more pictures at this stage (actually, that's one of the reason I'm starting this blog, a place to document the progress).

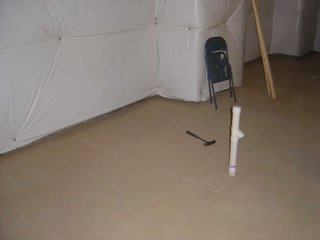
At this stage, I did tape off the location of the walls. This at least gave some indication of what the basement would look like


Design II

It was important in the design phase to narrow down our requirements for the space. Before our visions for the new basement could start to become a reality, we had to put physical dimensions on the rooms. It quickly became apparent to me, that we should not try accomplish too much with the basement. Even though it was a large basement, we didn't want to cram too many rooms in, and thus make the space less useful.

With that in mind, a couple decisions were made:

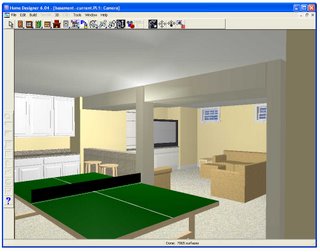
- a ping-pong table instead of a pool table (first, it takes up less room since a pool table requires free space on all sides, and second, I like ping-pong more)

- Since we can't make it to the gym nearly as much as we used to (pre-Jack), we wanted a workout space we could use. We figured that this space could be converted at some point to a spare bedroom

- In order to fit the ping-pong table, the bar would consit of wall cabinets, with the "bar" portion being a half-wall separating the rec-room

So, at this point, having an initial design, I was ready to start the work... Finally!

Friday, July 14, 2006

Design


So after doing some research, I was now ready to begin the planning stage. I should point out, that this was probably the most frustrating phase for me. After reading several texts on design and construction, I was eager to begin the actual work -- putting up walls, running wire, etc. However, no work could actually begin before the details of the layout were solidified.

I decided to purchase a design tool, so I could experiment with different basement layouts before starting the work. Home Designer 6.0 from Better Homes and Gardens was the choice. The cost was about $60, and it was WELL worth it. The tool not only allows you to create walls, but it gives you the ability to place furniture/fixtures, as well as view the design in 3D.


The first step was to take dimensions of the basement. Taking these measurements, I transcribed the outside wall-plan with the design tool. The next step was to determine how the space should be used -- the layout of the rooms, function of the rooms, etc.

The unfinished basement was as follows:
  • The basement was a walk-up (door with stairway leading outside)
  • It was pre-plumbed for a bathroom, with a roughed-in shower drain and toilet drain.
  • A roughed-in drain for a sink (presumably a wet-bar) in the middle of the floor. Given this information.
  • The bathroom rough-ins were adjacent to the external door
  • The HVAC are placed practically at the base of the stairs
Katie and I then listed possible uses of the basement:
  • TV Room
  • Bar/Kitchen
  • Bathroom/Shower
  • Exercise Room
  • Storage
  • PingPong/Pool
  • Play Area (Jackson)
Clearly we had limited space (about 1100sqft), so we had to priotize. Ultimately, we decided that we needed storage and a bathroom/shower, and would like to have a TV room, an Exercise Room (which could be converted into a bedroom down the road), and a room for a ping-pong and a bar.

Catching Up


I'm starting this blog a bit late -- I started working on finishing my basement in late 2005, and today, I've decided to share and document the experience. Since I'm behind, I'm going to have to do a bit of catching up.....

The Beginning

The basement was unfunished when we moved in (the picture of the house shows it in the summer of '05, note the pregnant Katie on the porch). We wanted to finish it, but with Jackson Wesley coming in September, didn't have a lot of time at first (well, haven't had much time since either) ,so the project was delyaed until late 2005. While, I have done some basic work around the house (replacing switches, some painting, some really basic carpentry), I had never done anything on the level of finishing a basement. So, the first thing I had to decide was what, if anything, I was going to do myself. I called up a couple of the thousand or so general contractors which deposited their adverts in my mailbox and door (any new development is ripe for this paper deluge). Based on the size and the type of rooms I was thinking about, the ball-park estimates ranged from $20K-$50K, so certainly anything I could do myself should be well worth my time. Of course, this necessitates some type of time-value analysis. My friend Brian actually has spent a bit of time trying to anaylze what his time was worth, but perhaps that's the subject of another blog....

So, after thinking about it, i decided to take on as much as I could. I figure this had the following advantages:

  • I would save a lot of money
  • There was no big time rush, since the house sans basement would be big enough for Katie, Jackson, myself
  • I'd learn how to do a bunch of contruction-related stuff
  • I'd get to buy a lot of cool tools

So, with this in-depth analysis, and not much knowledge, I embarked on this journey....

The Research

Ok, I didn't know much about finishing my basement, but I at least I know I didn't know much. So, starting at about the time Jackson was born, I searched for some help. The resource I liked the best was the book: Remodeling a Basement. This was a pretty good book which gave a lot of how-to info, partnered with some good design ideas. It was designed more for people like me who didn't have too much experience. Addiitonally, there were some good web-sites, papers, and books that offered design ideas, which is probably the trickiest part of the job

So, as of late september, I was off reading through material to figure out what I wanted to do with my basement, and then what tasks I felt like I could accomplish myself...